Tools
This page offers tools for recording, processing, annotating, and reconstructing human motions from the dataset. All source codes and supporting documents are available in our GitHub repository, complete with a detailed installation guide. In summary:
(1) Recoder provides instructions, codes, and documents on constructing a recording framework that supports high-quality synchronized streaming, saving, and visualization of human-human throw&catch activities using multiple sensors.
(2) Processor converts the raw data captured with the proposed recording framework (particularly the sensors) into processed data in commonly used formats and aligns all data across different modalities.
(3) Annotator offers an interactive interface that enables users to visually validate and annotate each recorded throw&catch activity with a hierarchy of semantic and dense labels.
(4) Human motion constructor constructs and optimizes human motions using multi-modal data streams in the dataset, and re-target the constructed human motions to multiple robots and multi-fingered hands.
(5) Hand joint position extraction extracts hand joint positions based on the captured euler joint angles from StretchSense MoCap Pro (SMP) Gloves and defined bone lengths.
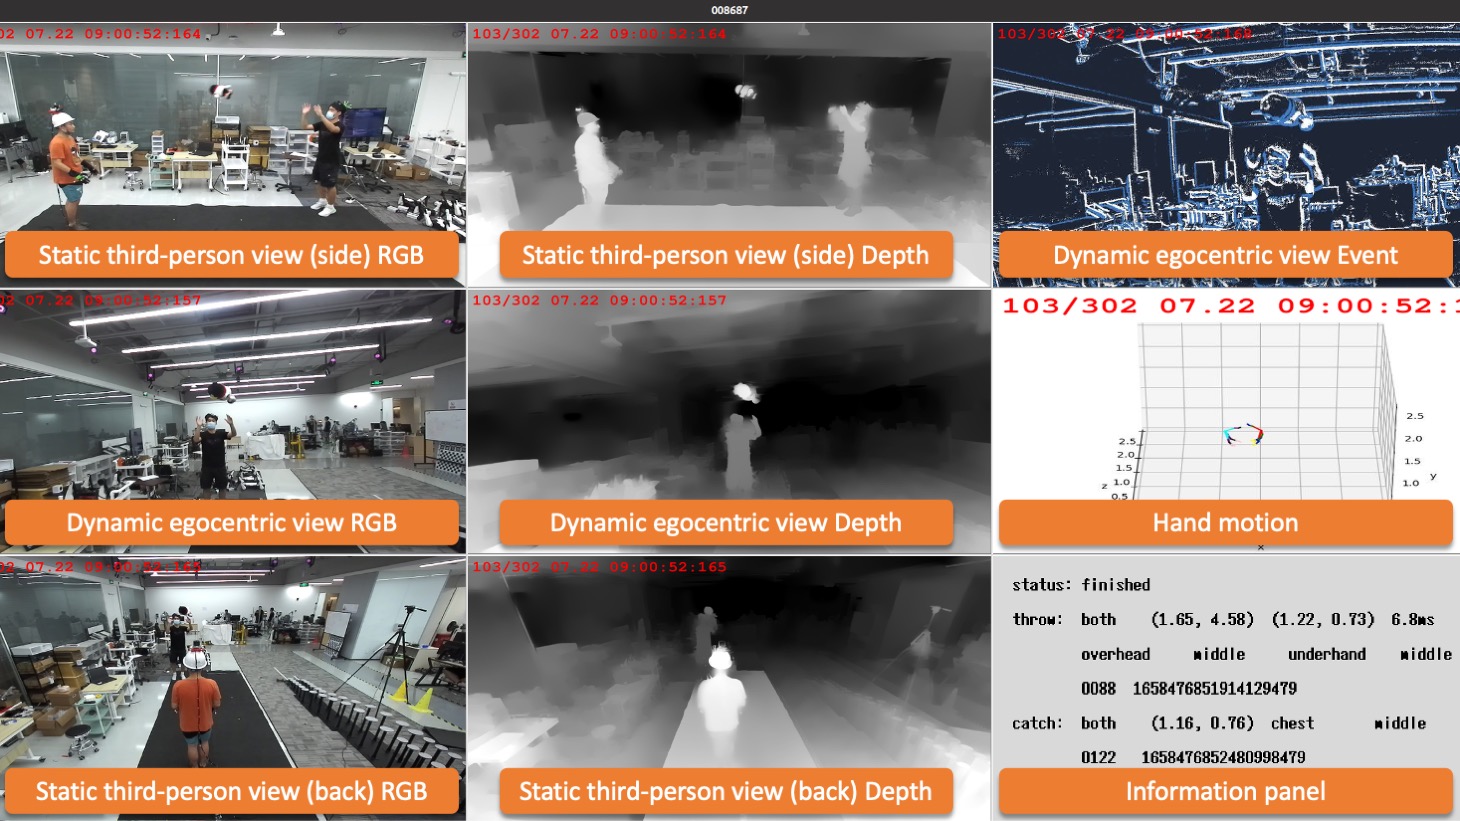
(6) Visualization offers an interactive interface that enables users to visually browse the synchronized frames of all data streams simultaneously in a way like playing videos.
Data Processing
The processor synchronizes all data streams captured from different sensors and converts the raw data into processed data in commonly used formats, as listed below.
All data, both raw and processed, are stored alongside a variety of supporting files and organized in a hierarchical manner.
We refer users to data processing tutorials documentation,
data explanation and our technical paper for a detailed introduction to the data hierarchy and the content of each involved data file.
| Device | Raw | Processed | ||
| Data | File | Data | File | |
| ZED | Left-eye and right-eye RGB videos | .SVO | RGB images | .PNG |
| Depth maps (unnormalized) | .NPY | |||
| Depth images (normalized) | .PNG | |||
| Event | Binary events in EVT3.0 format | .RAW | Events (x, y, p, t) | .CSV |
| Sensor setting for recording | .BIAS | Event images | .JPG | |
| MoCap Pro | Sensors' reading and hand joint angles | .CSV | Hand joint motion | .CSV |
| Hand calibration parameters | .CAL | Hand joint positions | .JSON | |
| 3D animation visualization | .FBX | |||
| Metadata of the recording | .JSON | |||
| OptiTrack | Local and global transformatiom matrices | .CSV | Body motion in throw-catch frame | .CSV |
We suggest users to visit our GitHub repository for more detailed, step-by-step instructions on processing the data from scratch. Briefly, users can follow the three steps below to process the raw data:
Step 1: Fetch the Raw Data. You can access all recorded raw data from Dropbox. The raw data of each recorded throw&catch activity is compressed in a .zip file.
Step 2: Extract the Raw Data. We provide a scripted data extractor to unzip the packaged raw data and organize all raw files in an appropriate data hierarchy, as previously mentioned.
python src/extract.py --srcpath raw_data_path --tarpath your_path
--srcpath is where the downloaded raw data is stored. --tarpath is the target path where you want to extract the raw data.
Step 3: Process the Extracted Data. After the data has been extracted and organized appropriately, run the processor :
python src/process.py --datapath your_path/data
--datapath is where your extracted data is located.
We refer users to the data processing documentation for complete technical details on how we process the multi-modal and cross-device raw data. Additionally, take a look at the data file explanation and our technical paper for a detailed introduction to the data hierarchy and the content of each involved data file.
Annotator
The annotator enables users to visually segment and annotate each recorded activity with a hierarchy of semantic and dense annotations. Overall, it provides:
(1) An interactive annotation interface: The interface displays all synchronized streams in an interactive window, as shown below, allowing users to inspect and annotate each recording frame by frame.
(2) A variety of annotation operations: Users can easily interact with the interface to label temporal segmentation and annotations using keyboard operations.
(3) An information panel: The annotation results are displayed in real-time in the information panel. Any modifications to the annotation results are immediately saved in the corresponding annotation file.

|
We recommend users to read the comprehensive annotation guide for a detailed explanation of the annotator and its usage, as well as the dataset annotation.
Human Motion Construction and Retargeting
I. Coarse human pose estimation
We use mmhuman3d to estimate the coarse human poses.
(1) Installation: please follow the official getting started for installation.
(2) H2TC data: Download h2tc data and fetch the rgbd0 image folder.
(3) SMPL related resources and pretrained models:
SMPL v1.0 and some other resources from mmhuman3d that are needed in this step:
J_regressor_extra.npy J_regressor_h36m.npy smpl_mean_params.npz Pretrained models
Download the resources and arrange them as follows:
    mmhuman3d
    ├── mmhuman3d
    ├── docs
    ├── tests
    ├── tools
    ├── configs
    └── data
        ├── gmm_08.pkl
        ├── body_models
        │   ├── J_regressor_extra.npy
        │   ├── J_regressor_h36m.npy
        │   ├── smpl_mean_params.npz
        │   └── smpl
        │       ├── SMPL_FEMALE.pkl
        │       ├── SMPL_MALE.pkl
        │       └── SMPL_NEUTRAL.pkl
        ├── pretrained
        │   └── spin_pretrain.pth
        └── static_fits
            ├── coco_fits.npy
            ├── h36m_fits.npy
            ├── lspet_fits.npy
            ├── lsp_fits.npy
            ├── mpii_fits.npy
            └── mpi_inf_3dhp_fits.npy
To extract human poses from the input images or video with the human tracking and pose estimation, you can first cd mmhuman3d and then run:
python demo/estimate_smpl.py configs/spin/resnet50_spin_pw3d.py data/checkpoints/spin_pretrained.pth --multi_person_demo --tracking_config demo/mmtracking_cfg/deepsort_faster-rcnn_fpn_4e_mot17-private-half.py --input_path L:/h2tc_dataset/002870/processed/rgbd0 --show_path vis_results/002870.mp4 --smooth_type savgol --speed_up_type deciwatch --draw_bbox --output vis_results/
The human poses will be stored in vis_results/inference_result.npz with smpl format.
II. Multi-modal based human pose optimization
(1) Installation:
conda create -n pose python=3.7
conda activate pose
conda install pytorch==1.6.0 torchvision==0.7.0 cudatoolkit=10.1 -c pytorch
pip install matplotlib, opencv-python,scikit-learn,trimesh,Pillow,pyrender,pyglet==1.5.15,tensorboard,git+https://github.com/nghorbani/configer,torchgeometry==0.1.2,smplx==0.1.28
(2) Download smplh
(3) File structure:
pose_reconstruction_frommm
|--config.py
|--fitting_utls.py
|--h2tc_fit_dataset_mm.py
|--motion_optimizer.py
|--run_fitting_mm.py
|--smplh_male.npz       # smplh model (male)
|--fit_h2tc_mm.cfg      # config file
(4) Run the multi-modal optimizer to optimize the human poses with the opti-track data and glove hands.
python pose_reconstruction_frommm/run_fitting_mm.py @./fit_h2tc_mm.cfg --data-path <h2tc_takeid_processed_folder> --mmhuman <mmhuman_file> --out <out_pose_folder>
<h2tc_takeid_processed_folder>: the processed folder, like root/002870/processed/rgbd0.
<mmhuman_file>: the coarse pose file extracted from Coarse human pose estimation, like root/vis_results/inference_result.npz
<out_pose_folder>: folder path to save the optimization pose results. The output meshes are saved in <out_pose_folder>/body_meshes_humor. Optimized human poses are saved in <out_pose_folder>/results_out/stage2_results.npz
* Optimization Algorithm
Due to inevitable visual occlusion, the results of mmhuman are coarse, especially in arms and hands. Taking into account the multi-modal data collected in our dataset, including OptiTrack, gloves poses, rgb images and so on, these information can help us optimize the mmhuman results.
Given the coarse mmhuman pose estimation $\mathcal{M_{mmh}}$, OptiTrack head and hands tracking points $\mathcal{H}$ and glove hands poses $\Theta_{hand}$, we aim to recover the accurate human poses $\mathcal{M_{acc}}$. Our optimization objective is:
The OptiTrack term $\mathcal{C_{trk}}$ measures how well the posed body model match the OptiTrack points
\(\mathbf{P}_t = \left \{ \mathbf{d}_t^i \right \}_{i=0}^{3}\) for head and two-hand points at each frame $t$. We use the mesh corresponding vertices
$\mathbf{V}_t$ (index 411 for the head OptiTrack data, 5459 for the right hand and 2213 for the left hand) to compute
The wrist cost $\mathcal{C_{wst}}$ is used to disambiguate the right/left wrist pose guided by hands tracking information. Meanwhile, the cost also contributes to recovering accurate whole-arm poses even in severe occlusions. We use the hand OptiTrack pose \(\mathbf{O}_t^{hand} = \left \{ \mathbf{o}_t^h \right \}_{i=0}^1\) to calculate the right $h=0$ and the left $h=1$ wrist loss. It is formulated as
where ${\mathbf{v}_{wri}}_t^h$ is the SMPLH right/left wrist pose.
Independent frame-by-frame pose estimation always causes temporal inconsistency. The regularization term $\mathcal{C_{smo}}$ is used to guarantee the smoothness of the motion recovering and keep it reasonable. The smooth term encourages the 3D joints consistency. It is formulated as
$\mathbf{J}_t$ is the joint position at time $t$.
Bone lengths $l_t^j$ are from $\mathbf{J}_t^j$ at each step.
For hands pose, we already have captured the two hands poses $\Theta_{hand}$ in each capturing. We map them to SMPLH hands pose directly.
We initialize the optimization processing with the mmhuman poses. All $\lambda$ are weights to decide the contribution of each term.
III. Retargeting
III.1 Smplh sequence pose -> General format animation (.fbx)
(1) Installation:
a. Install [Python FBX](https://download.autodesk.com/us/fbx/20112/fbx_sdk_help/index.html?url=WS1a9193826455f5ff453265c9125faa23bbb5fe8.htm,topicNumber=d0e8312).

b. Open `SMPL-to-FBX-main` and `pip install -r requirements.txt`
(2) SMPLX fbx:
Download the [SMPLX fbx model](https://smpl.is.tue.mpg.de) for unity. Keep the female model `smplx-female.fbx` and male model `smplx-male.fbx`.
(3) The file structure would be like:
SMPL-to-FBX-main
|--Convert.py
|--SMPLXObject.py
|--FbxReadWriter.py
|--<smplh_pose>/
|  |--*.npz
|--<fbx_path>/
|  |--smplx-female.fbx
|  |--smplx-male.fbx
|--<output_path>/
(4) Run
python Convert.py --input_motion_base <smplh_pose> --fbx_source_path <fbx_path>/smplx-female.fbx --output_base <output_path>
to start converting. The animation file will be saved in <output_path>. You can open it via Blender or Unity 3D.
III.2 Retargeting
We use Unity 3D (2022.3.17) to demostrate the retargeting. Plese check the tutorial video first, then you can follow the following steps:
(1) Model rigging: given a mesh model, bound the mesh vertices to bones
(2) Specifying the corresponding skeleton joints between rigged model A and B: Unity 3D automatically solves it after setting the rigged models as humanoid in animation type.
(3) Animation: please follow the above tutorial video. The animation algorithm used in Unity 3D is Linear Blend Skinning (LBS).
Four examples of motion construction and re-targeting using our dataset are shown below:
| take one | take two | take three | take four |
 |
 |
 |
 |
Hand joint position extraction
We extract hand joint positions (i.e., their XYZ 3D locations) based on the euler joint angles captured by Stretchsense MoCap Pro gloves and bone lengths using forward kenamatics. We provide a set of default bone lenghts:
finger_length['thumb'] = [None, 0.25, 0.11, 0.06]
finger_length['index'] = [0.34, 0.15, 0.08, 0.06]
finger_length['middle'] = [0.33, 0.15, 0.10, 0.07]
finger_length['ring'] = [0.31, 0.13, 0.10, 0.06]
finger_length['pinky'] = [0.3, 0.08, 0.06, 0.06]
but users can use their custom bone lengths to adapt to their specific needs and scenarios.
Specifically, hand joint position extraction has been integrated into plot_motion.py, which will be called by process.py during data extraction and processing. This means hand joint positions will be automatically extracted and saved along with other extracted and processed data from the raw zip files.
In addition, we provide a new script called src/utils/extract_hand_joint_positions.py to allow users to extract/adjust hand joint positions separately from the data processing process.
To run src/utils/extract_hand_joint_positions.py, users need to specify the root folder path of the take (e.g., data/001000):
python extract_hand_joint_positions.py --data_root path/to/the_take
In both cases, the extracted hand joint positions will be saved in json files, with joint positions of left hand in path/to/the_take/processed/left_hand_joint_positions.json and those of right hand in path/to/the_take/processed/right_hand_joint_positions.json.
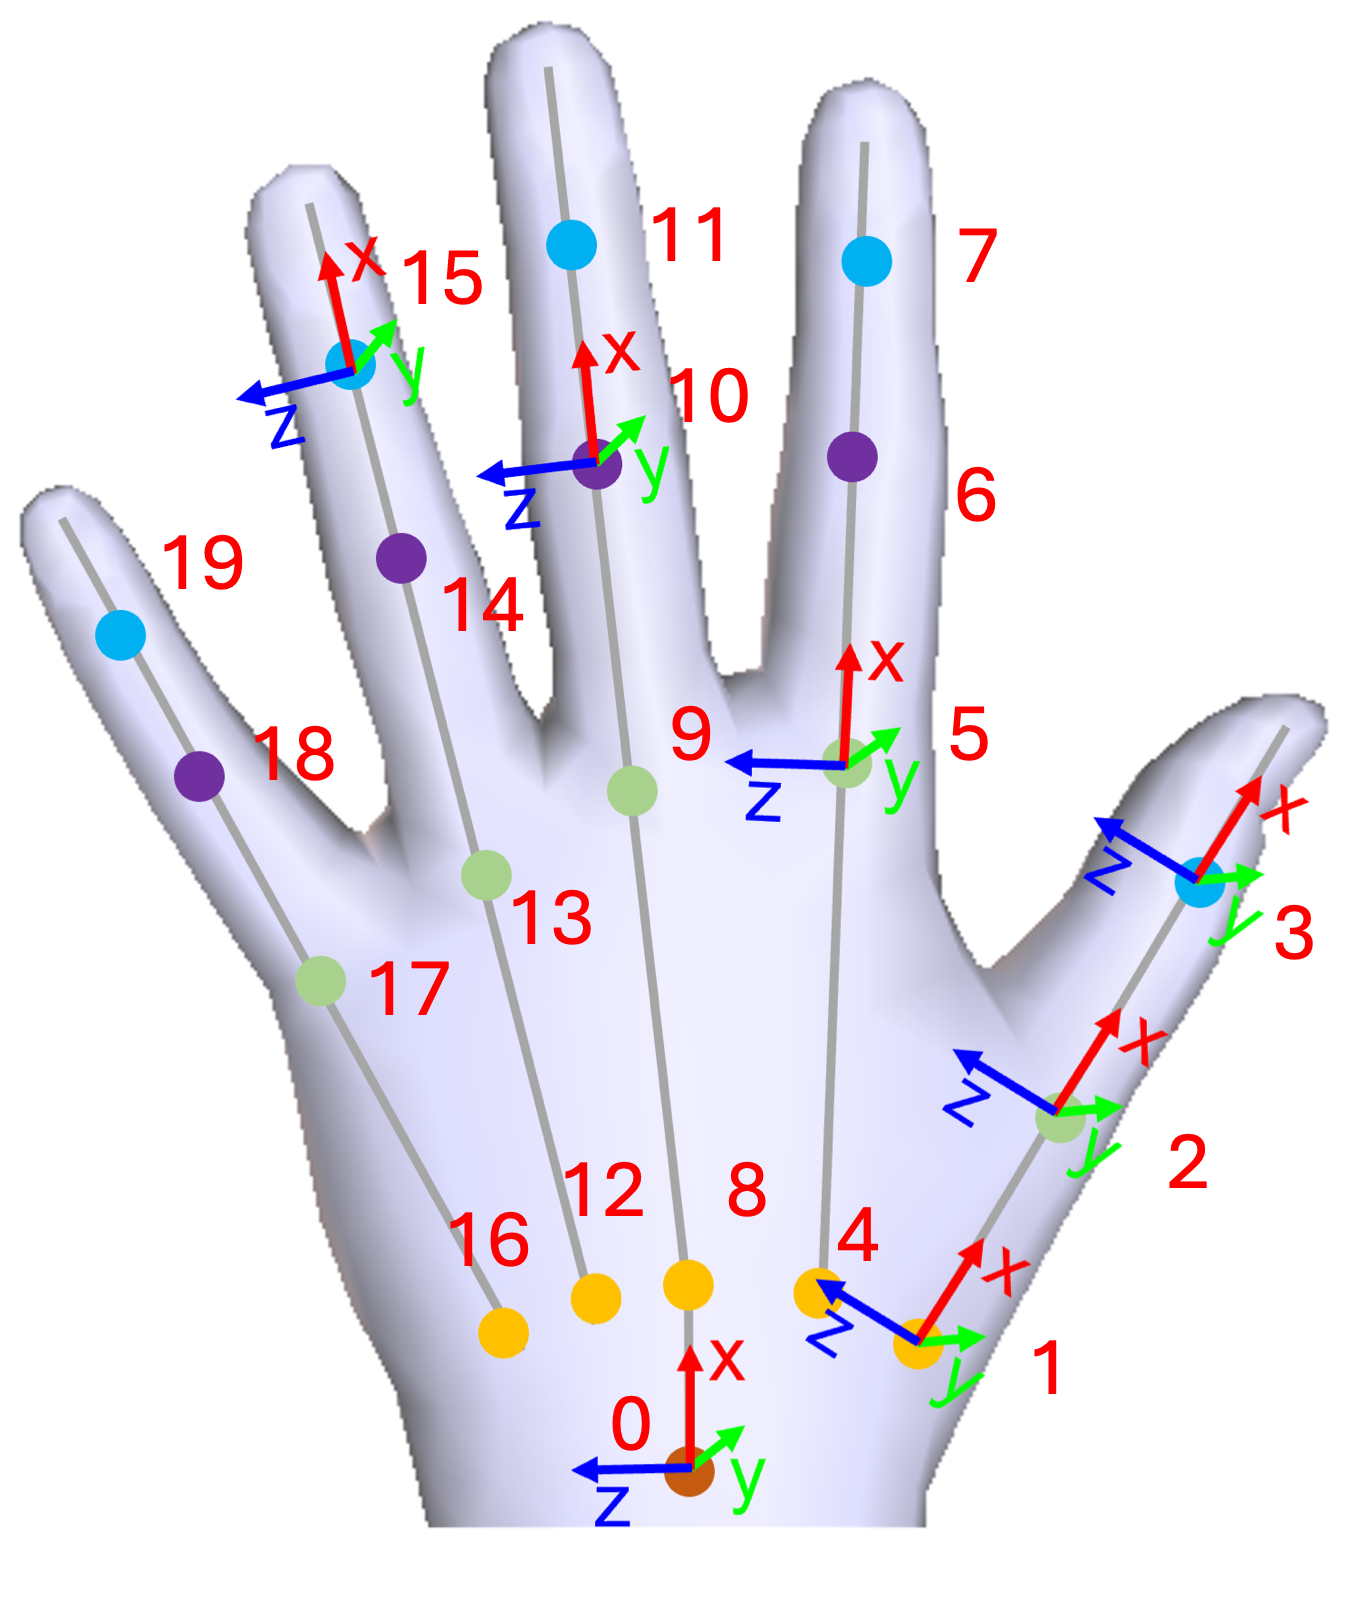
20 joint positions are saved, and the json file contains key-value entries with key representing frame number and value being a list of joint positions. In each list, from index 0 to index 19, the saved joint positions are indicated as below:

|
Visualization
The first step of using our visualization tool is to prepare the processed data. This can be done by the provided processor. Alternatively, for a quick browse, we offer the processed data of several sample takes that can be directly downloaded from here. Eventually, you should have the data stored in a path similar to this: PARENT_PATH/data/take_id/processed.
Now you can run the following command to launch the visualization tool:
python src/visualize.py --datapath PARENT_PATH/data --take take_id --speed 120
The argument --take specifies the ID of the take to be visualized if set, otherwise the first take under the given path will be loaded. --speed specifies the FPS for playing the frames of streams.
Once the interface is launched, you can navigate the visualization through the following operations:
(1) space: play/pause the videos of all streams
(2) right arrow: pause the video if played and forward to the next frame
(3) left arrow: pause the video if played and backward to the last frame
Below is an example of visualizing a take: